Hexo
安装node.js
下载
进入node.js的官网[https://nodejs.org/下载node.js最新稳定版就行
配置环境变量
将node.js根目录放入path变量中
安装git(官网下载,傻瓜式安装)
安装hexo
打开终端输入
1 | npm install -g hexo-cli |
创建项目
1 | hexo init blog |
其中blog为项目名字,可以自行修改
安装主题(以butterfly主题为例)
进入博客根目录,打开git bash
1 | git clone -b master https://github.com/jerryc127/hexo-theme-butterfly.git themes/butterfly |
安装成功后在themes中会出现butterfly文件夹,其中有配置文件_config.yml这是主题配置文件,而在博客根目录中也有配置文件_config.yml,两个配置文件呢不一样,不要混淆
切换主题
在项目的配置文件中通过ctrl+f搜索,找到theme将和面的主题配置改为theme: butterfly
设置语言和时区
找到配置文件
1 | language: zh-CH |
设置网站名称
主题配置文件中
1 | title: Hexo |
修改即可
下载渲染器
1 | npm install hexo-renderer-pug hexo-renderer-stylus --save |
启动项目
在根目录终端中输入(简称三连)
1.清除指令
1 | hexo clean |
2.编译指令
1 | hexo g |
3.运行指令
1 | hexo s |
其中编译和运行可以写为一个,这样就不用输入两次了,清除操作只有出bug的时候可以用用,不用每次都用
1 | hexo g&hexo s |
添加首页菜单
打开主题配置文件搜索 menu内容如下
1 | menu: |
自行修改
1 | menu: |
注意缩进
主页菜单居中
在themes\butterfly\source\css\custom.css中添加如下内容(如果没有目录创建目录)
1 | /* 一级菜单居中 */ |
找到主题配置文件搜索inject导入该css文件
1 | inject: |
设置背景(一图流为例)
在themes\butterfly\source\css\custom.css中添加如下内容(如果没有目录创建目录)
1 | /* 页脚与头图透明 */ |
可以按照自己喜好进行选择取消注释
在主题配置文件中搜索background,更改图片
在线图片
1 | background: url(www.example.com)#修改自己图片的网站 |
本地文件
在themes\butterfly\source\img下放入要使用的背景图
1 | background: url(/img/3.jpg)#填你自己的图片名称 |
开启动画(选择)
找到主题配置文件
1 | # 加载动画 Loading Animation |
markdown文档头部说明
| 写法 | 解释 |
|---|---|
| title | 【必需】页面标题 |
| date | 【必需】页面创建日期 |
| type(仅仅部分文件需要) | 【必需】仅仅标籤、分类和友情链接三个页面需要配置 |
| updated | 【可选】页面更新日期 |
| description | 【可选】页面描述 |
| keywords | 【可选】页面关键字 |
| comments | 【可选】显示页面评论模块(默认 true) |
| top_img | 【可选】页面顶部图片 |
| mathjax | 【可选】显示mathjax(当设置mathjax的per_page: false时,才需要配置,默认 false) |
| kates | 【可选】显示katex(当设置katex的per_page: false时,才需要配置,默认 false) |
| aside | 【可选】显示侧边栏 (默认 true) |
| aplayer | 【可选】在需要的页面加载aplayer的js和css,请参考文章下面的音乐 配置 |
| highlight_shrink | 【可选】配置代码框是否展开(true/false)(默认为设置中highlight_shrink的配置) |
新增页面
用于存放页面,现在的标签和分类是打不开的,需要自己创建
停止项目
1 | hexo new page ****(要创建的页面,根据主页菜单来进行选择) |
如(这里是菜单)
1 | menu: |
要创建分类
1 | hexo new page categories |
这样会在source\下创建了一个md文件
新增
1 | type: categories |
这样,一个分类页面就做好了,以此类推。
开启显示文章描述,有利于页面更加简洁
找到theme主题 配置项index_post_content将method改为2(显示描述)或3(显示文章内容),想要更加简洁的话可以使用2
首页打字效果
1 | subtitle: |
按照格式设置即可
更改头像
在线头像
1 | avatar: |
本地头像
1 | avatar: |
与背景图同理
文章置顶
- 你可以直接在文章的
front-matter区域里添加sticky: 1属性来把这篇文章置顶。数值越大,置顶的优先级越大。
图片懒加载
新增hexo-lazyload-image模块
1 | npm install hexo-lazyload-image --save |
在站点配置文件_config.yml增加配置
1 | lazyload: |
onlypost: 是否仅文章中的图片做懒加载, 如果为 false, 则主题中的其他图片, 也会做懒加载, 如头像, logo 等任何图片.
loadingImg - 图片未加载时的代替图
不填写使用默认加载图片, 如果需要自定义,添填入 loading 图片地址,如果是本地图片,不要忘记把图片添加到你的主题目录下。 Next 主题需将图片放到 \themes\next\source\images 目录下, 然后引用时: loadingImg: /images/图片文件名
增加PDF阅读器
1 | npm install --save hexo-pdf |
将PDF放入md文件对应的资源文件夹在md文件中插入
1 | {% pdf 1.pdf %} |
魔改
魔改鼠标
新建文件
[BlogRoot]\source\js\cursor.js,在里面写上如下代码:1
2
3
4
5
6
7
8
9
10
11
12
13
14
15
16
17
18
19
20
21
22
23
24
25
26
27
28
29
30
31
32
33
34
35
36
37
38
39
40
41
42
43
44
45
46
47
48
49
50
51
52
53
54
55
56
57
58
59
60
61
62
63
64
65
66
67
68
69
70
71
72
73
74
75
76
77
78
79
80
81
82
83var CURSOR;
Math.lerp = (a, b, n) => (1 - n) * a + n * b;
const getStyle = (el, attr) => {
try {
return window.getComputedStyle
? window.getComputedStyle(el)[attr]
: el.currentStyle[attr];
} catch (e) {}
return "";
};
class Cursor {
constructor() {
this.pos = {curr: null, prev: null};
this.pt = [];
this.create();
this.init();
this.render();
}
move(left, top) {
this.cursor.style["left"] = `${left}px`;
this.cursor.style["top"] = `${top}px`;
}
create() {
if (!this.cursor) {
this.cursor = document.createElement("div");
this.cursor.id = "cursor";
this.cursor.classList.add("hidden");
document.body.append(this.cursor);
}
var el = document.getElementsByTagName('*');
for (let i = 0; i < el.length; i++)
if (getStyle(el[i], "cursor") == "pointer")
this.pt.push(el[i].outerHTML);
document.body.appendChild((this.scr = document.createElement("style")));
// 这里改变鼠标指针的颜色 由svg生成
this.scr.innerHTML = `* {cursor: url("data:image/svg+xml,<svg xmlns='http://www.w3.org/2000/svg' viewBox='0 0 8 8' width='8px' height='8px'><circle cx='4' cy='4' r='4' opacity='.5'/></svg>") 4 4, auto}`;
}
refresh() {
this.scr.remove();
this.cursor.classList.remove("hover");
this.cursor.classList.remove("active");
this.pos = {curr: null, prev: null};
this.pt = [];
this.create();
this.init();
this.render();
}
init() {
document.onmouseover = e => this.pt.includes(e.target.outerHTML) && this.cursor.classList.add("hover");
document.onmouseout = e => this.pt.includes(e.target.outerHTML) && this.cursor.classList.remove("hover");
document.onmousemove = e => {(this.pos.curr == null) && this.move(e.clientX - 8, e.clientY - 8); this.pos.curr = {x: e.clientX - 8, y: e.clientY - 8}; this.cursor.classList.remove("hidden");};
document.onmouseenter = e => this.cursor.classList.remove("hidden");
document.onmouseleave = e => this.cursor.classList.add("hidden");
document.onmousedown = e => this.cursor.classList.add("active");
document.onmouseup = e => this.cursor.classList.remove("active");
}
render() {
if (this.pos.prev) {
this.pos.prev.x = Math.lerp(this.pos.prev.x, this.pos.curr.x, 0.15);
this.pos.prev.y = Math.lerp(this.pos.prev.y, this.pos.curr.y, 0.15);
this.move(this.pos.prev.x, this.pos.prev.y);
} else {
this.pos.prev = this.pos.curr;
}
requestAnimationFrame(() => this.render());
}
}
(() => {
CURSOR = new Cursor();
// 需要重新获取列表时,使用 CURSOR.refresh()
})();其中比较重要的参数就是鼠标的尺寸和颜色,已经在上图中标出,目前发现颜色只支持RGB写法和固有名称写法(例如red这种),其他参数也可以自行摸索:
1
* {cursor: url("data:image/svg+xml,<svg xmlns='http://www.w3.org/2000/svg' viewBox='0 0 8 8' width='8px' height='8px'><circle cx='4' cy='4' r='4' opacity='1.0' fill='rgb(57, 197, 187)'/></svg>") 4 4, auto}`
在
[BlogRoot]\source\css\custom.css添加如下代码:1
2
3
4
5
6
7
8
9
10
11
12
13
14
15
16
17
18
19
20
21
22
23
24
25
26
27
28
29
30
31
32
33
34
35
36/* 鼠标样式 */
#cursor {
position: fixed;
width: 16px;
height: 16px;
/* 这里改变跟随的底色 */
background: var(--theme-color);
border-radius: 8px;
opacity: 0.25;
z-index: 10086;
pointer-events: none;
transition: 0.2s ease-in-out;
transition-property: background, opacity, transform;
}
#cursor.hidden {
opacity: 0;
}
#cursor.hover {
opacity: 0.1;
transform: scale(2.5);
-webkit-transform: scale(2.5);
-moz-transform: scale(2.5);
-ms-transform: scale(2.5);
-o-transform: scale(2.5);
}
#cursor.active {
opacity: 0.5;
transform: scale(0.5);
-webkit-transform: scale(0.5);
-moz-transform: scale(0.5);
-ms-transform: scale(0.5);
-o-transform: scale(0.5);
}这里比较重要的参数就是鼠标跟随的圆形颜色,可以根据自己的喜好进行更改:
1
2
3
4#cursor {
/* 这里改变跟随的底色 */
background: rgb(57, 197, 187);
}在主题配置文件
_config.butterfly.yml文件的inject配置项引入刚刚创建的css文件和js文件:1
2
3
4
5inject:
head:
+ - <link rel="stylesheet" href="/css/custom.css">
bottom:
+ - <script defer src="/js/cursor.js"></script>重启项目即可看见效果:
1
2BASH
hexo cl; hexo s
友链制作
1.通过命令创建友链页面
1 | hexo new page link |
2.在[Blogroot]\source\link\index.md 中添加内容
1 | --- |
3.新建文件[Blogroot]\source\_data\link.yml没有_data文件夹的话也请自己新建;输入(以安知鱼为列)
1 | - class_name: 推荐博客 |

页脚
首先要卸载店长的
hexo-butterfly-footer-beautify插件,因为我将页脚直接写成一个pug,个人觉得插件很多冗余的地方用不到,因此卸载了,否则会冲突:1
npm un hexo-butterfly-footer-beautify --save
在主题配置文件
_config.butterfly.yml或者站点配置文件_config.yml删除插件相关的配置项:1
2
3
4
5
6
7
8
9
10
11
12
13
14
15
16
17
18
19
20
21
22
23
24
25
26
27
28
29
30
31
32
33
34
35
36
37
38
39
40
41
42DIFF
-footer_beautify:
- enable:
- timer: true # 计时器开关
- bdage: true # 徽标开关
- priority: 5 #过滤器优先权
- enable_page: all # 应用页面
- exclude: #屏蔽页面
- # - /posts/
- # - /about/
- layout: # 挂载容器类型
- type: id
- name: footer-wrap
- index: 0
- runtime_js: https://npm.elemecdn.com/hexo-butterfly-footer-beautify@1.0.0/lib/runtime.js
- runtime_css: https://npm.elemecdn.com/hexo-butterfly-footer-beautify@1.0.0/lib/runtime.css
- # 徽标部分配置项
- swiperpara: 0 #若非0,则开启轮播功能,每行徽标个数
- bdageitem:
- - link: https://hexo.io/ #徽标指向网站链接
- shields: https://img.shields.io/badge/Frame-Hexo-blue?style=flat&logo=hexo #徽标API
- message: 博客框架为Hexo_v6.2.0 #徽标提示语
- - link: https://butterfly.js.org/
- shields: https://img.shields.io/badge/Theme-Butterfly-6513df?style=flat&logo=bitdefender
- message: 主题版本Butterfly_v4.3.1
- - link: https://vercel.com/
- shields: https://img.shields.io/badge/Hosted-Vercel-brightgreen?style=flat&logo=Vercel
- message: 本站采用多线部署,主线路托管于Vercel
- - link: https://dashboard.4everland.org/
- # https://img.shields.io/badge/Hosted-4EVERLAND-3FE2C1?style=flat&logo=IPFS
- shields: https://img.shields.io/badge/Hosted-4EVERLAND-22DDDD?style=flat&logo=IPFS
- message: 本站采用多线部署,备用线路托管于4EVERLAND
- - link: https://github.com/
- shields: https://img.shields.io/badge/Source-Github-d021d6?style=flat&logo=GitHub
- message: 本站项目由Github托管
- - link: http://creativecommons.org/licenses/by-nc-sa/4.0/
- shields: https://img.shields.io/badge/Copyright-BY--NC--SA%204.0-d42328?style=flat&logo=Claris
- message: 本站采用知识共享署名-非商业性使用-相同方式共享4.0国际许可协议进行许可
- swiper_css: https://npm.elemecdn.com/hexo-butterfly-swiper/lib/swiper.min.css
- swiper_js: https://npm.elemecdn.com/hexo-butterfly-swiper/lib/swiper.min.js
- swiperbdage_init_js: https://npm.elemecdn.com/hexo-butterfly-footer-beautify/lib/swiperbdage_init.min.js将
[BlogRoot]/themes/butterfly/layout/includes/footer.pug替换成如下代码这块东西分为几个部分,一个是以#ft为块的DOM,其中分为了格言、猜你想看、推荐友链三部分,参考图中的位置结合自己的喜好进行修改即可,图像、文字和链接均替换成你自己的(记住不要用我的链接!!!);if theme.footer.owner.enable起这一块是主题指定的信息版权信息,我把主题配置项的copyright和custom_text这两项留空了,因此只会显示©2022 By Fomalhaut🥝;再然后就是#workboard这块,这块的信息由js逻辑写入与更新,可以自定义;最后是p#ghbdages这块,是徽标显示,大家可以到shields.io按照自己的信息生成(不要用我的!!!):1
2
3
4
5
6
7
8
9
10
11
12
13
14
15
16
17
18
19
20
21
22
23
24
25
26
27
28
29
30
31
32
33
34
35
36
37
38
39
40
41
42
43
44
45
46
47
48
49
50
51
52
53
54
55
56
57
58
59
60
61
62
63
64
65
66
67
68
69
70
71
72
73
74
75
76
77
78
79
80
81
82
83
84
85
86
87
88
89
90
91
92
93
94
95
96
97
98
99
100
101
102
103
104
105
106
107
108
109PLAINTEXT
复制成功
#footer-wrap
#ft
.ft-item-1
.t-top
.t-t-l
p.ft-t.t-l-t 格言🧬
.bg-ad
div
| 再看看那个光点,它就在这里,这是家园,这是我们 —— 你所爱的每一个人,你认识的一个人,你听说过的每一个人,曾经有过的每一个人,都在它上面度过他们的一生✨
.btn-xz-box
a.btn-xz(href='https://stellarium.org/') 点击开启星辰之旅
.t-t-r
p.ft-t.t-l-t 猜你想看💡
ul.ft-links
li
a(href='/posts/eec9786.html') 魔改指南
a(href='/box/nav/') 网址导航
li
a(href='/social/link/') 我的朋友
a(href='/comments/') 留点什么
li
a(href='/personal/about/') 关于作者
a(href='/archives/') 文章归档
li
a(href='/categories/') 文章分类
a(href='/tags/') 文章标签
li
a(href='/box/Gallery/') 我的画廊
a(href='/personal/bb/') 我的唠叨
li
a(href='/site/time/') 建设进程
a(href='/site/census/') 网站统计
.ft-item-2
p.ft-t 推荐友链⌛
.ft-img-group
.img-group-item
a(href='https://www.fomal.cc/' title='Fomalhaut🥝')
img(src='https://lskypro.acozycotage.net/LightPicture/2022/12/60e5d4e39da7c077.webp' alt='')
.img-group-item
a(href='https://tzy1997.com/' title='唐志远の博客')
img(src='https://lskypro.acozycotage.net/LightPicture/2022/12/4ab83cdce942463b.jpg' alt='')
.img-group-item
a(href='https://akilar.top/' title='Akilarの糖果屋')
img(src='https://lskypro.acozycotage.net/LightPicture/2022/12/6bf1ed05796db59c.jpg' alt='')
.img-group-item
a(href='https://butterfly.js.org/' title='Butterfly')
img(src='https://lskypro.acozycotage.net/LightPicture/2022/12/64cc6a7d508026e1.png' alt='')
.img-group-item
a(href='https://anzhiy.cn/' title='安知鱼')
img(src='https://lskypro.acozycotage.net/LightPicture/2022/12/1b33fef8f5fb7e63.jpg' alt='')
.img-group-item
a(href='https://www.acozycotage.net/' title='Acozycotage')
img(src='https://lskypro.acozycotage.net/LightPicture/2022/12/6a6fe6ebfd19c465.jpg' alt='')
.img-group-item
a(href='https://cdn.netdun.net/' title='网盾星球')
img(src='https://lskypro.acozycotage.net/LightPicture/2022/12/70dee3f9d1ca10f3.webp' alt='')
.img-group-item
a(href='javascript:void(0)' title='广告位招租')
img(src='https://lskypro.acozycotage.net/LightPicture/2022/12/65307a5828af6790.webp' alt='')
if theme.footer.owner.enable
- var now = new Date()
- var nowYear = now.getFullYear()
if theme.footer.owner.since && theme.footer.owner.since != nowYear
.copyright
span!= `<b>©${theme.footer.owner.since} - ${nowYear}</b>`
span!= `<b> By ${config.author}</b>`
else
.copyright
span!= `<b>©${nowYear}</b>`
span!= `<b> By ${config.author}</b>`
if theme.footer.copyright
.framework-info
span= _p('footer.framework') + ' '
a(href='https://hexo.io')= 'Hexo'
span.footer-separator |
span= _p('footer.theme') + ' '
a(href='https://github.com/jerryc127/hexo-theme-butterfly')= 'Butterfly'
if theme.footer.custom_text
.footer_custom_text!=`${theme.footer.custom_text}`
#workboard
p#ghbdages
a.github-badge(target='_blank' href="https://hexo.io/" style='margin-inline:5px' title="博客框架为Hexo_v6.3.0")
img(src="https://sourcebucket.s3.ladydaily.com/badge/Frame-Hexo-blue.svg" alt='')
a.github-badge(target='_blank' href="https://butterfly.js.org/" style='margin-inline:5px' title="主题版本Butterfly_v4.3.1")
img(src="https://sourcebucket.s3.ladydaily.com/badge/Theme-Butterfly-6513df.svg" alt='')
a.github-badge(target='_blank' href="https://vercel.com/" style='margin-inline:5px' title="本站采用多线部署,主线路托管于Vercel")
img(src="https://sourcebucket.s3.ladydaily.com/badge/Hosted-Vercel-brightgreen.svg" alt='')
a.github-badge(target='_blank' href="https://user.51.la/" style='margin-inline:5px' title="本站数据分析得益于51la技术支持")
img(src="https://sourcebucket.s3.ladydaily.com/badge/Analytics-51la-3db1eb.svg" alt='')
a.github-badge(target='_blank' href="https://icp.gov.moe/?keyword=20226665" style='margin-inline:5px' title="本站已加入萌ICP豪华套餐,萌ICP备20226665号")
img(src="https://sourcebucket.s3.ladydaily.com/badge/萌ICP备-20226665-fe1384.svg" alt='')
a.github-badge(target='_blank' href="https://bitiful.dogecast.com/buckets" style='margin-inline:5px' title="本网站经Service Worker分流至缤纷云对象存储")
img(src=" https://sourcebucket.s3.ladydaily.com/badge/Bucket-缤纷云-9c62da.svg" alt='')
a.github-badge(target='_blank' href="https://www.netdun.net/" style='margin-inline:5px' title="本站使用网盾星球提供CDN加速与防护")
img(src="https://sourcebucket.s3.ladydaily.com/badge/CDN-网盾星球-fff2cc.svg" alt='')
a.github-badge(target='_blank' href="https://github.com/" style='margin-inline:5px' title="本网站源码由Github提供存储仓库")
img(src=" https://sourcebucket.s3.ladydaily.com/badge/Source-Github-d021d6.svg" alt='')将以下代码复制到自定义的
custom.css中,其中颜色、圆角等可以根据你自己的喜好进行修改:1
2
3
4
5
6
7
8
9
10
11
12
13
14
15
16
17
18
19
20
21
22
23
24
25
26
27
28
29
30
31
32
33
34
35
36
37
38
39
40
41
42
43
44
45
46
47
48
49
50
51
52
53
54
55
56
57
58
59
60
61
62
63
64
65
66
67
68
69
70
71
72
73
74
75
76
77
78
79
80
81
82
83
84
85
86
87
88
89
90
91
92
93
94
95
96
97
98
99
100
101
102
103
104
105
106
107
108
109
110
111
112
113
114
115
116
117
118
119
120
121
122
123
124
125
126
127
128
129
130
131
132
133
134
135
136
137
138
139
140
141
142
143
144
145
146
147
148
149
150
151
152
153
154
155
156
157
158
159
160
161
162
163
164
165
166
167
168
169
170
171
172
173
174
175
176
177
178
179
180
181
182
183
184
185
186
187
188
189
190
191
192
193
194
195
196
197
198
199
200
201
202
203
204
205
206
207
208
209
210
211
212
213
214
215
216
217
218
219
220
221
222
223
224
225
226
227
228
229
230
231
232
233
234
235
236
237
238
239
240
241
242
243
244
245
246/* tzy页脚样式 */
#ft {
max-width: 1200px;
margin: 0 auto 12px;
display: flex;
color: rgb(255 255 255 / 80%) ;
text-align: left;
flex-wrap: wrap;
}
.ft-item-1,
.ft-item-2 {
display: flex;
height: 100%;
padding: 2px 14px;
}
.ft-item-1 {
flex-direction: column;
flex: 2;
}
.ft-item-2 {
flex: 1;
flex-direction: column;
}
.t-top {
display: flex;
}
.t-top .t-t-l {
display: flex;
flex-direction: column;
flex: 1.4;
margin-right: 10px;
}
.t-top .t-t-l .bg-ad {
width: 85%;
border-radius: 10px;
padding: 0 10px;
}
.btn-xz-box {
margin-top: 10px;
}
/* 按钮背景颜色等 */
.btn-xz {
display: block;
background-color: var(--btn-bg);
color: var(--btn-color);
text-align: center;
line-height: 2.4;
margin: 8px 0;
}
.btn-xz:hover {
text-decoration: none ;
}
/* 按钮悬浮颜色 */
.btn-xz-box:hover .btn-xz {
background-color: var(--text-bg-hover);
}
.t-top .t-t-r {
display: flex;
flex-direction: column;
flex: 1;
}
.ft-links {
padding: 0 14px;
list-style: none;
margin-top: 0 ;
}
.ft-links li a {
display: inline-block ;
width: 50%;
}
/* 链接悬浮颜色 */
.ft-links li a:hover {
text-decoration: none ;
color: var(--theme-color) ;
}
.ft-item-2 .ft-img-group {
width: 100%;
}
.ft-t {
font-size: 1.1rem;
margin-bottom: 20px;
line-height: 1;
font-weight: 600;
}
.t-l-t {
padding-left: 14px;
}
.ft-item-2 .ft-img-group .img-group-item {
display: inline-block;
width: 18.4%;
margin-right: 14px;
margin-bottom: 6px;
}
.ft-item-2 .ft-img-group .img-group-item a {
display: inline-block;
width: 100%;
height: 100%;
}
.ft-item-2 .ft-img-group .img-group-item a img {
width: 100%;
max-height: 80px;
border-radius: 10px;
}
/* 头像悬浮颜色框 */
.ft-item-2 .ft-img-group .img-group-item a img:hover {
border: 2px solid var(--theme-color);
}
@media screen and (max-width: 768px) {
.ft-item-1 {
flex-basis: 100% ;
}
.ft-item-2 {
flex-basis: 100% ;
}
.t-top .t-t-l .bg-ad {
width: 100%;
}
}
@media screen and (max-width: 576px) {
.t-top {
flex-wrap: wrap;
}
.t-top .t-t-l {
flex-basis: 100% ;
}
.t-top .t-t-r {
margin-top: 16px;
flex-basis: 100% ;
}
}
#footer-wrap a {
border-radius: 30px;
}
#footer-wrap {
padding: 20px 20px;
}
/* 页脚心跳动画 */
#heartbeat {
color: red;
animation: iconAnimate 1s ease-in-out infinite;
}
@-moz-keyframes iconAnimate {
0%,
100% {
transform: scale(1);
}
10%,
30% {
transform: scale(0.9);
}
20%,
40%,
60%,
80% {
transform: scale(1.1);
}
50%,
70% {
transform: scale(1.1);
}
}
@-webkit-keyframes iconAnimate {
0%,
100% {
transform: scale(1);
}
10%,
30% {
transform: scale(0.9);
}
20%,
40%,
60%,
80% {
transform: scale(1.1);
}
50%,
70% {
transform: scale(1.1);
}
}
@-o-keyframes iconAnimate {
0%,
100% {
transform: scale(1);
}
10%,
30% {
transform: scale(0.9);
}
20%,
40%,
60%,
80% {
transform: scale(1.1);
}
50%,
70% {
transform: scale(1.1);
}
}
@keyframes iconAnimate {
0%,
100% {
transform: scale(1);
}
10%,
30% {
transform: scale(0.9);
}
20%,
40%,
60%,
80% {
transform: scale(1.1);
}
50%,
70% {
transform: scale(1.1);
}
}然后计时器还要往
#footer-wrap这块元素上面写入网站运行时间等信息,新建文件[BlogRoot]\source\js\runtime.js,写入如下代码。这里要修改的几块东西是:网站诞生时间、currentTimeHtml这块东西;其中currentTimeHtml分为了两种模式,对应两个不同的图标,自行研究一下就懂!1
2
3
4
5
6
7
8
9
10
11
12
13
14
15
16
17
18
19
20
21
22
23
24
25
26
27
28
29
30
31
32
33JS
复制成功
var now = new Date();
function createtime() {
// 当前时间
now.setTime(now.getTime() + 1000);
var start = new Date("08/01/2022 00:00:00"); // 旅行者1号开始计算的时间
var dis = Math.trunc(23400000000 + ((now - start) / 1000) * 17); // 距离=秒数*速度 记住转换毫秒
var unit = (dis / 149600000).toFixed(6); // 天文单位
var grt = new Date("08/09/2022 00:00:00"); // 网站诞生时间
var days = (now - grt) / 1e3 / 60 / 60 / 24,
dnum = Math.floor(days),
hours = (now - grt) / 1e3 / 60 / 60 - 24 * dnum,
hnum = Math.floor(hours);
1 == String(hnum).length && (hnum = "0" + hnum);
var minutes = (now - grt) / 1e3 / 60 - 1440 * dnum - 60 * hnum,
mnum = Math.floor(minutes);
1 == String(mnum).length && (mnum = "0" + mnum);
var seconds = (now - grt) / 1e3 - 86400 * dnum - 3600 * hnum - 60 * mnum,
snum = Math.round(seconds);
1 == String(snum).length && (snum = "0" + snum);
let currentTimeHtml = "";
(currentTimeHtml =
hnum < 18 && hnum >= 9
? `<img class='boardsign' src='https://sourcebucket.s3.ladydaily.com/badge/F小屋-科研摸鱼中.svg' title='什么时候能够实现财富自由呀~'><br> <div style="font-size:13px;font-weight:bold">本站居然运行了 ${dnum} 天 ${hnum} 小时 ${mnum} 分 ${snum} 秒 <i id="heartbeat" class='fas fa-heartbeat'></i> <br> 旅行者 1 号当前距离地球 ${dis} 千米,约为 ${unit} 个天文单位 🚀</div>`
: `<img class='boardsign' src='https://sourcebucket.s3.ladydaily.com/badge/F小屋-下班休息啦.svg' title='下班了就该开开心心地玩耍~'><br> <div style="font-size:13px;font-weight:bold">本站居然运行了 ${dnum} 天 ${hnum} 小时 ${mnum} 分 ${snum} 秒 <i id="heartbeat" class='fas fa-heartbeat'></i> <br> 旅行者 1 号当前距离地球 ${dis} 千米,约为 ${unit} 个天文单位 🚀</div>`),
document.getElementById("workboard") &&
(document.getElementById("workboard").innerHTML = currentTimeHtml);
}
// 设置重复执行函数,周期1000ms
setInterval(() => {
createtime();
}, 1000);在主题配置文件
_config.butterfly.yml引入该runtime.js文件:1
2
3
4DIFF
inject:
bottom:
+ - <script defer src="/js/runtime.js"></script> # 页脚计时器到这里你已经成功了 99.99%,最后重新编译运行即可看见效果
1
2BASH
hexo cl; hexo s
添加图片
1.1.找到Hexo下的_config.yml里的post_asset_folder,把这个选项从false改成true
2.在Hexo目录下打开Git Brsh,执行一个下载上传图片插件的命令npm install https://github.com/CodeFalling/hexo-asset-image(bug,插件bug)
3.继续在Git Brsh下利用hexo n “xxxx”来生成md的文件(” “里的内容填自己的文件名),这时就会在同级的目录下生成一个同名的文件夹。
4.在.md的文件中要插入图片时,先要把所要插入的图片放在生成的同名文件夹下。
设置代码默认长度
在主题配置文件中修改highlight_height_limit 后面数字为像素px
一图流
在
[BlogRoot]\source文件夹下新建一个文件夹css,该文件夹用于存放自定义的css样式,再新建一个名为custom.css,在里面写入以下代码:1
2
3
4
5
6
7
8
9
10
11
12
13
14
15
16
17
18
19
20
21
22
23
24
/* 页脚与头图透明 */
#footer {
background: transparent ;
}
#page-header {
background: transparent ;
}
/* 白天模式遮罩透明 */
#footer::before {
background: transparent ;
}
#page-header::before {
background: transparent ;
}
/* 夜间模式遮罩透明 */
[data-theme="dark"] #footer::before {
background: transparent ;
}
[data-theme="dark"] #page-header::before {
background: transparent ;
}在主题配置文件
[BlogRoot]\_config.butterfly.yml文件中的inject配置项的head子项加入以下代码,代表引入刚刚创建的custom.css文件(这是相对路径的写法)1
2
3inject:
head:
- <link rel="stylesheet" href="/css/custom.css" media="defer" onload="this.media='all'">在主题配置文件
[BlogRoot]\_config.butterfly.yml文件中的index_img和footer_bg配置项取消头图与页脚图的加载项避免冗余加载1
2
3
4
5# The banner image of home page
index_img:
# Footer Background
footer_bg: false部分人反映一图流改完了背景图也没了,那大概率是你之前没设置背景图。在主题配置文件
[BlogRoot]\_config.butterfly.yml文件中的background配置项设置背景图1
background: url(https://source.fomal.cc/img/home_bg.webp)
文章页面侧面菜单只保留目录
在主题配置文件中将style_simple改为true
主页导航栏居中
1 | /* 一级菜单居中 */ |
设置文章标题居中
找到themes\butterfly\source\css\_layout\head.styl目录,修改post-info
1 | #post-info |
修改字体大小
在主题配置文件中font设置
将文章栏目改为双栏
在博客根目录
[BlogRoot]下打开终端,运行以下指令:1
npm i hexo-butterfly-article-double-row --save
在网站配置文件
_config.yml新增以下项 (注意不是主题配置文件):1
2butterfly_article_double_row:
enable: true这时候插件有个bug,就是最后一页文章数目为奇数的时候,会出现这种情况

会显得很不舒服,感谢唐志远大佬修复了这个bug,只需要在
custom.css文件添加以下代码即可:1
2
3
4
5/* 翻页按钮居中 */
#pagination {
width: 100%;
margin: auto;
}执行 hexo 三连:
1
2
3hexo clean
hexo g
hexo s
首页分类(未成功)
效果预览
安装插件,在博客根目录
[BlogRoot]下打开终端,运行以下指令:1
npm install hexo-butterfly-categories-card --save
添加配置信息,以下为写法示例
在站点配置文件_config.yml或者主题配置文件_config.butterfly.yml中添加以下代码,注意要根据他的默认描述排序改为你自己对应的分类名字:1
2
3
4
5
6
7
8
9
10
11
12
13
14
15
16
17
18
19
20
21
22
23
24
25
26# hexo-butterfly-categories-card
# see https://akilar.top/posts/a9131002/
categoryBar:
enable: true # 开关
priority: 5 #过滤器优先权
enable_page: / # 应用页面
layout: # 挂载容器类型
type: id
name: recent-posts
index: 0
column: odd # odd:3列 | even:4列
row: 1 #显示行数,默认两行,超过行数切换为滚动显示
message:
- descr: Ubuntu指南
cover: https://assets.akilar.top/image/cover1.webp
- descr: 玩转Win10
cover: https://assets.akilar.top/image/cover2.webp
- descr: 长篇小说连载
cover: https://assets.akilar.top/image/cover3.webp
- descr: 个人日记
cover: https://assets.akilar.top/image/cover4.webp
- descr: 诗词歌赋
cover: https://assets.akilar.top/image/cover5.webp
- descr: 杂谈教程
cover: https://assets.akilar.top/image/cover6.webp
custom_css: https://npm.elemecdn.com/hexo-butterfly-categories-card@1.0.0/lib/categorybar.css参数释义
| 参数 | 备选值/类型 | 释义 |
|---|---|---|
| priority | number | 【可选】过滤器优先级,数值越小,执行越早,默认为10,选填 |
| enable | true/false | 【必选】控制开关 |
| enable_page | path/all | 【可选】填写想要应用的页面的相对路径(即路由地址),如根目录就填’/‘,分类页面就填’/categories/‘。若要应用于所有页面,就填’all’,默认为’/‘ |
| layout.type | id/class | 【可选】挂载容器类型,填写id或class,不填则默认为id |
| layout.name | text | 【必选】挂载容器名称 |
| layout.index | 0和正整数 | 【可选】前提是layout.type为class,因为同一页面可能有多个class,此项用来确认究竟排在第几个顺位 |
| column | odd/even | 【可选】显示列数,考虑到比例问题,只提供3列和4列,odd为3列, even为4列 |
| row | number | 【可选】显示行数,默认两行,超过行数切换为滚动显示 |
| message.descr | text | 分类描述,需要和你自己的文章分类一一对应。 |
| message.cover | url | 分类背景,需要和你自己的文章分类一一对应。 |
| custom_css | url | 【可选】自定义样式,会替换默认的css链接,可以下载文档给出的cdn链接后自主修改 |
置顶文章并且滚动
安装插件,在博客根目录
[BlogRoot]下打开终端,运行以下指令:1
npm install hexo-butterfly-swiper --save
添加配置信息,以下为写法示例
在站点配置文件_config.yml或者主题配置文件_config.butterfly.yml中添加1
2
3
4
5
6
7
8
9
10
11
12
13
14
15
16# hexo-butterfly-swiper
# see https://akilar.top/posts/8e1264d1/
swiper:
enable: true # 开关
priority: 5 #过滤器优先权
enable_page: all # 应用页面
timemode: date #date/updated
layout: # 挂载容器类型
type: id
name: recent-posts
index: 0
default_descr: 再怎么看我也不知道怎么描述它的啦!
swiper_css: https://npm.elemecdn.com/hexo-butterfly-swiper/lib/swiper.min.css #swiper css依赖
swiper_js: https://npm.elemecdn.com/hexo-butterfly-swiper/lib/swiper.min.js #swiper js依赖
custom_css: https://npm.elemecdn.com/hexo-butterfly-swiper/lib/swiperstyle.css # 适配主题样式补丁
custom_js: https://npm.elemecdn.com/hexo-butterfly-swiper/lib/swiper_init.js # swiper初始化方法参数释义
| 参数 | 备选值/类型 | 释义 |
|---|---|---|
| priority | number | 【可选】过滤器优先级,数值越小,执行越早,默认为10,选填 |
| enable | true/false | 【必选】控制开关 |
| enable_page | path/all | 【可选】填写想要应用的页面的相对路径(即路由地址),如根目录就填’/‘,分类页面就填’/categories/‘。若要应用于所有页面,就填’all’,默认为all |
| timemode | date/updated | 【可选】时间显示,date为显示创建日期,updated为显示更新日期,默认为date |
| layout.type | id/class | 【可选】挂载容器类型,填写id或class,不填则默认为id |
| layout.name | text | 【必选】挂载容器名称 |
| layout.index | 0和正整数 | 【可选】前提是layout.type为class,因为同一页面可能有多个class,此项用来确认究竟排在第几个顺位 |
| default_descr | text | 默认文章描述 |
| swiper_css | url | 【可选】自定义的swiper依赖项css链接 |
| swiper_js | url | 【可选】自定义的swiper依赖项加js链接 |
| custom_css | url | 【可选】适配主题样式补丁 |
| custom_js | url | 【可选】swiper初始化方法 |
使用方法:在文章的front_matter中添加swiper_index配置项即可。
1 | MARKDOWN |
PDF插件
安装hexo-pdf插件
1
npm install hexo-pdf --save
外挂标签的引用格式如下:
- 标签语法
- 参数配置
- 示例源码
1
2
3
4# 1.本地文件:在md文件路径下创建一个同名文件夹,其内放pdf文件名为xxx.pdf的文件
{% pdf xxx.pdf %}
# 2.在线链接
{% pdf https://cdn.jsdelivr.net/gh/Justlovesmile/CDN/pdf/小作文讲义.pdf %}重启项目即可看到变更
1
hexo cl; hexo s
修改
页脚
修改页脚内容themes\butterfly\layout\includes\footer.pug
修改样式themes\butterfly\source\css\custom.css
修改运行时间themes\butterfly\source\js\runtime.js
CDN
直接更换cdn链接即可
更改配置项
链接
我这里只列出我在用的cdn,我没有用到的cdn可以在评论中留言,有时间我会补充。
jquery
1 | https://lf6-cdn-tos.bytecdntp.com/cdn/expire-1-M/jquery/3.6.0/jquery.min.js |
pjax
1 | https://lib.baomitu.com/pjax/0.2.8/pjax.min.js |
sharejs
1 | https://lib.baomitu.com/social-share.js/1.0.16/js/social-share.min.js |
gittalk
1 | gitalk: https://lf6-cdn-tos.bytecdntp.com/cdn/expire-1-M/gitalk/1.7.2/gitalk.min.js |
valine
1 | https://lf3-cdn-tos.bytecdntp.com/cdn/expire-1-M/valine/1.4.16/Valine.min.js |
disqusjs
1 |
|
twikoo(这个是定制版)
1 | https://cdn1.tianli0.top/npm/js-heo@1.0.3/twikoo/twikoo.all.min.js |
twikoo(官方版)
1 | https://lf6-cdn-tos.bytecdntp.com/cdn/expire-1-M/twikoo/1.4.18/twikoo.all.min.js |
waline
1 | https://lf3-cdn-tos.bytecdntp.com/cdn/expire-1-M/waline/1.5.4/Waline.min.js |
algolia
1 | algolia_js: https://cdn1.tianli0.top/npm/js-heo@1.0.11/algolia/algolia.js |
lazyload
1 | https://lf3-cdn-tos.bytecdntp.com/cdn/expire-1-M/vanilla-lazyload/17.3.1/lazyload.iife.min.js |
instantpage
1 | https://lf3-cdn-tos.bytecdntp.com/cdn/expire-1-M/instant.page/5.1.0/instantpage.min.js |
typed
1 | https://lf9-cdn-tos.bytecdntp.com/cdn/expire-1-M/typed.js/2.0.12/typed.min.js |
fancybox
1 | fancybox_css: https://lf3-cdn-tos.bytecdntp.com/cdn/expire-1-M/fancybox/3.5.7/jquery.fancybox.min.css |
medium_zoom
1 | https://lf6-cdn-tos.bytecdntp.com/cdn/expire-1-M/medium-zoom/1.0.6/medium-zoom.min.js |
snackbar
1 | snackbar_css: https://lf3-cdn-tos.bytecdntp.com/cdn/expire-1-M/node-snackbar/0.1.16/snackbar.min.css |
fontawesome
1 | https://lf6-cdn-tos.bytecdntp.com/cdn/expire-1-M/font-awesome/6.0.0/css/all.min.css |
translate
1 | https://cdn1.tianli0.top/npm/js-heo@1.0.6/translate/tw_cn.js |
aplayer
1 | aplayer_css: https://lf6-cdn-tos.bytecdntp.com/cdn/expire-1-M/aplayer/1.10.1/APlayer.min.css |
Prism
1 | prismjs_js: https://cdn1.tianli0.top/npm/prismjs@1.1.0/prism.js |
justifiedGallery
1 | justifiedGallery_js: https://lf3-cdn-tos.bytecdntp.com/cdn/expire-1-M/justifiedGallery/3.8.1/js/jquery.justifiedGallery.min.js |
CDN选择原则
优先使用字节跳动的cdn,如果没有则使用elemecdn。
个人社交资料
在themes\butterfly\_config.yml中修改内容,社交图标https://fontawesome.com/
网站图表
头像
修改首页打字机文字
subtitle
图床
1.基于Github仓库的图床
优点:
- 很稳定不会跑路,用的是自己的仓库和公共托管平台
- 图片可以增量快速更新和跨设备管理
- 可以进行版本管理和查看之前的版本
- 有公共CDN,速度还是不错的
- 资源格式可以任意都行,包括
css、js等
缺点:
- 每个仓库限制1G,超过要新建另一个仓库
- git管理可能偶尔会遇到网络和公钥失效问题
1.1 建立Github仓库
进入Github官网注册并登录自己的账号,到自己的个人主页,点击右上角的
+,并选择New Repository创建自己的仓库。仓库名字随意,描述也可以自由发挥,可见性最好选
public,Readme文件可以创建,然后点击Create Repository创建仓库。让你的计算机与Github建立通信,这部分可以参考Hexo 博客搭建基础教程 (一)的第7点,主要是
创建公钥、上传公钥、检查通信这几步,确保计算机有权限访问远程仓库,所述教程是用的RSA公钥,目前更推荐ed25519公钥,该数字签名算法的签名和验证的性能都极⾼,具体教程百度这里不再赘述。先在本地创建一个文件夹,文件夹位置和名字随意就可以,进入该文件夹后右键打开
Git Bash,然后输入以下代码把之前创建的仓库拷贝下来,其中git clone后面的东西要替换成自己的仓库信息,可以通过自己仓库的ssh链接来获取。1
2BASH
git clone git@github.com:fomalhaut1998/pic_bed.git看到上图的信息就代表成功把整个仓库拷贝到当前文件夹了,此时我们可以看见自己的文件夹多了个
.git文件夹和Readme.md文件,这就代表成功了。此时我们最好在这个文件夹里面创建创建一个
img文件夹专门存放图片,如果有存放其他类型资源的可以创建别的文件夹,比如现在想往仓库里加两张图,直接就把图片复制到img文件夹里面即可。然后在带有
Readme.md文件的那个文件夹内,右键打开Git Bash(注意看清楚是什么文件夹),然后依次输入以下命令把更改推送到远程仓库,最后一步不成功可能要多试几次。1
2
3
4
5
6BASH
# 将更改提交
git add .
git commit -m "更新图片"
# 推送至github仓库
git push最后看见如下信息就代表推送成功了
仓库此时应该也有了刚刚上传的资源了下次增删图片或者其他东西,就这样照猫画虎就可以推上来更新仓库!

1.2 Staticaly CDN加速
直接访问Github仓库的资源是非常慢的!因此我们要用一些免费的CDN进行加速,Staticaly CDN是目前免费CDN中比较好用的啦,他的应用规则如下:
1 | PLAINTEXT |
1.3 Vercel 部署
此方法加载速度较快,但是需要域名自定义绑定,其优点也是可以绑定自定义域了,目前Vercel每个月限制流量100GB
进入Vercel控制面板新建项目,并
通过Github继续,选择导入刚刚创建的仓库,然后直接部署即可进入该项目控制台后,选择右上角的
View Domains添加新的域名,添加一个自己域名的二级域名,然后在你对应的域名解析控制台添加对应解析,等待生效。通过
自定义域名+资源路径即可访问到对应的资源,例如我这里为https://picbed.fomal.cc/img/p1.webp要更新图片怎么办?只要将资源复制到对应的文件夹,然后再执行一次下面的命令即可:
1
2
3
4
5
6BASH
# 将更改提交
git add .
git commit -m "更新图片"
# 推送至github仓库
git push这个命令默认是更新到仓库的
main分支上,Vercel一旦检测到main分支发送变化就会触发新一轮部署,我们稍候片刻即可通过新的路径访问到新的资源。
1.4 Cloudflare 部署
此方法速度比Vercel稍慢,但是可以不需要域名,目前我就在用这个,而且CloudFlare对于普通用户来说几乎不限量了
进入Cloudflare官网注册并登录自己的账号,然后进入控制台后选择左边的
Pages,再创建一个新项目并通过Git进行连接,所有参数默认直接部署。通过给出的
初始域名+资源路径即可访问到的对应资源,例如我这个就是pic-bed-c6s.pages.dev/img/p1.webp,当然你也可以绑定自定义域名使用。
2.免费图床推荐
- 这部分免费图床就太多了,我会把我目前发现的可以免费白嫖一定额度的图床做一个总结列在下面
- 这部分图床的搭建门槛较低,所以速度和稳定性良莠不齐,大家自行选择使用哪个
- 我这里只给大家演示一种的使用方法,其他图床使用方法也类似
- 大家可以看看哪个比较好用的或者自己知道的好用的这里没有,可以留言我会进行补充
| 🍕 | 🥗 | 🍤 |
|---|---|---|
| SMMS | 聚合图床 | 遇见图床 |
| PostImage | 路过图床 | imgURL |
| imgbox | Lsky Pro | Upload.cc |
| imagelol | imgtp | 云图床 |
| 载涂图床 | Sky Chart Bed | 风筝图床 |
| 喷子图床 | imgkb |
- 使用方法:直接进入官网,上传图片然后粘贴地址即可,地址的样式有多样,自行选择。
- 选择要点:
- 速度:大家可以到Ping.cn进行测试
- 稳定性与安全性:看看图床创建时间,网上评价等
- 可适用性:支持的格式越多肯定是越好的,有部分支持
webp和其他格式的,可以当资源床
3.PicGo结合Markdown实时上传图片
Picgo究竟是什么?这是一个开源软件,开源地址:Molunerfinn/PicGo
引用项目的介绍:这是一个用于快速上传图片并获取图片 URL 链接的工具,关键是他可以与Typora配套一起使用,在粘贴图片的同时上传图片,十分方便!
最新版我这里实测没办法安装一些插件,因此推荐大家安装v2.3.1-beta.5这个版本
下载软件后直接一路安装下去就行,建议装在非C盘的任意一个盘。
3.1 Github图床
进入软件之后,一路到设置里面取消勾选其他图床,只留下Github图床一项,因为我们的现在要弄Github图床。
然后到Github新建一个仓库,创建仓库的教程前面有讲,这里就不赘述了,
仓库名字和描述随意,最重要的是权限一定要选public,这样你的图片才可以随时随地访问到。在图床设置的Github配置处,按照下图填入对应的信息:自定义域名的格式为:
https://cdn.staticaly.com/gh/用户名/仓库名@main,比如我的就是https://cdn.staticaly.com/gh/fomalhaut1998/markdown_pic@main,对应的用户名和仓库名记住要换成自己名字,不能有空格!!!Token的获取方式为:
右上角头像->Setting->左边栏Developer Settings->左栏Personal access tokens->左栏tokens(classic)创建Token时,
Note随意;Exporation选No expiration,Select scopes必须把repo这一项勾上,然后点击生成就行这个时候必须马上复制出现的token,不然后面就看不到了,复制了填进去刚刚的Token选项,随后点击确定保存
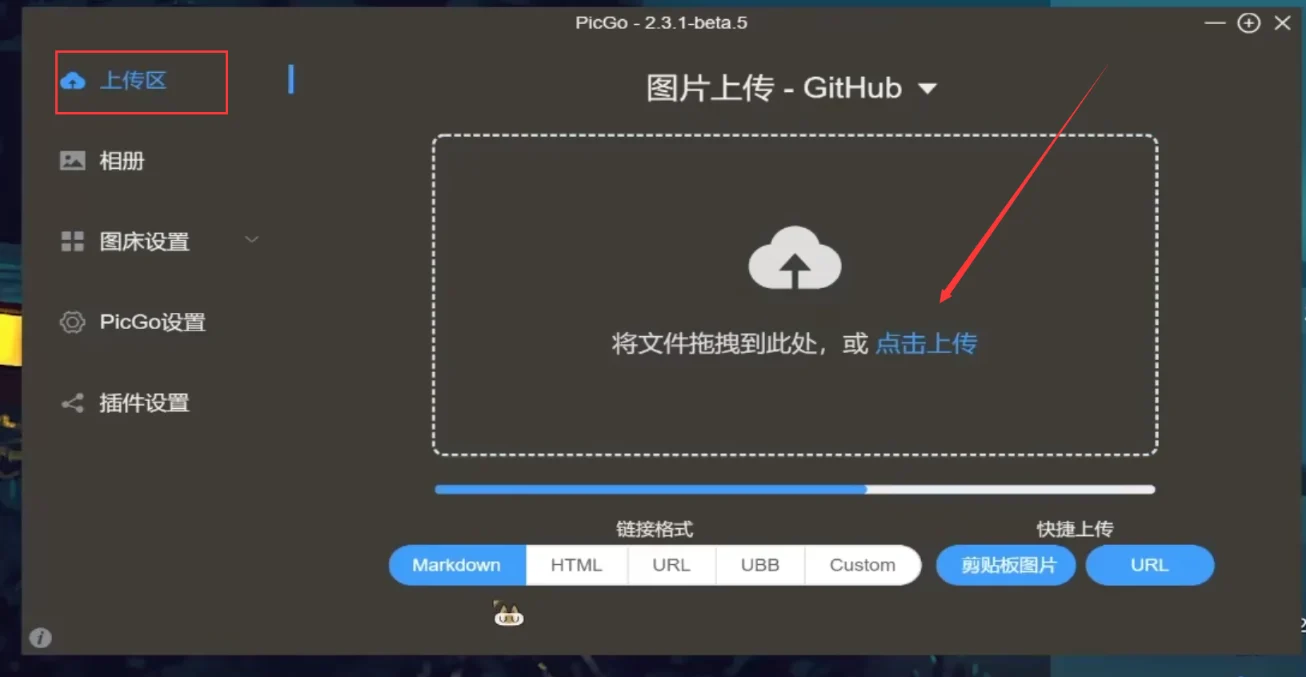
随便拖拽一张图片进来上传区域这里,应该就可以上传成功,随后把生成的链接复制就可以,此时打开仓库可以发现图片上传到了指定的文件夹。注意:每个仓库大小限制是1G!!!
3.2 Vika图床
Vika图床的服务器在国内,速度是比较快的
首先在Picgo里面安装Vikadata的插件
我们要填的信息有下面这几项:
进入维格表官网,注册自己的账号并登录,新建一个空白的维格表
随后点击左下角头像的个人设置,绑定自己的邮箱后,获取
API Token进入刚刚创建的表格后,点击上边的
API,进入API界面后,依次点击显示API Token->Get 获取,然后图中框起来的就是我们需要的维格表ID和API Token填进去对应位置后,到上传区域,把图床换成维格表,试试拖拽图片能不能上传!
3.3 Bilibili图床
- 由于这个图床用在博客里存在跨域问题,因此不再推荐使用了,开源地址:typora-plugin-bilibili
- 如需了解使用教程,见视频教程第12期:免费图床综合教程(二)
3.4 imgtp图床
- 开源地址:picgo-plugin-imgtp
在Picg插件商店搜索并安装该插件
进入imgtp注册并登录自己的账号,记住账号密码,待会儿要用到
进入控制台,然后进入
设置,就可以看到右边有Token这一项,这些就是我们要的全部信息随后在imgtp的配置信息里面填上
账号、密码、Token这几项即可填进去对应位置后,到上传区域,把图床换成维格表,试试拖拽图片能不能上传!